
EXAMPLE FEDERATION SHIPS
These ships are meant as examples, to help you recognize ships that meet the design principles here. Adjust them to fit your playstyle. 🙂
If you would like to request a ship design that is not shown here, email me at me@pixelperfectguide.com with the strategy you want, along with ship level and type.
Many thanks to pixyship.com for their amazing ship-building tool. I’ve used it prior to every new ship design to try out new ideas.
Level 5 Fed Teleport
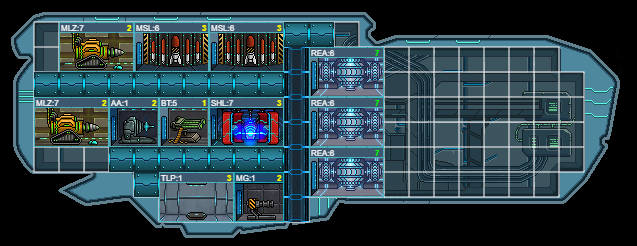
Good about this build:
- Armoring is very efficient due to stacking three rows of rooms with armor between them.
- Power usage is balanced. All rooms can be powered for the whole fight, so you don’t need to worry about power management AI quite yet.
Bad about this build:
- One tall lift will make crew congestion a problem. Use AI to try to keep your crew on the same level.
- Boarders can travel between reactors easily. If boarders are an issue for you, move the middle reactor to the right one space and add a security gate between the lift. This way whatever reactor a boarder ports into, the next reactor they go to (they will always go to the closest one) will have a lift in the way.
Level 5 Fed Gunship
This is a guest build by Mockingj4y

Good about this build:
- Aggressive build with PP and BT (at level 5 you practically need BT on all ship types due to limited gun options).
- The two levels allow for quick crew movement to repair.
- Missiles and lasers are grouped together to allow easy repair AI. For example crew sitting in the shield can be told to repair missile rooms less than 100% health and get to either quickly.
Bad about this build:
- Power is underused, all rooms only use 16 out of the 21 generated. The only options for additional rooms are the teleport, and engine. However if you do not have good boarding crew, it doesn’t make sense to include the teleport since it’s one more room that needs armor. Engines are not very effective at level 5.
- The SHL and BT, probably the two most targeted rooms, are next to the elevator. This will mean crew will wait there to use the lift while under fire. This could be remedied moving the bottom row of rooms to the right by one space, and adding a security gate between the lift and the shield room.
Level 6 Fed Hangar

Good about this build:
- Armoring is fairly even.
- Rooms are grouped by type.
- Strategy seems good, centered around the hangar. PP removes shield so that your lasers and missiles can kill the AA before the craft die.
- Power is one over, 22/21. The sec gate and AA won’t be powered all the time, so this is fine.
Bad about this build:
- One lift may be a point of congestion, especially if the missiles or AA are focused and lots of repairers have to come from the top row to the bottom. To counter this, keep some crew with home rooms in the bottom row.
Level 7 Fed Gunship

Good about this build:
- Aggressive gunship with double BT and PP. Missiles can be used flexibly, try using one pen missile for more direct damage, and one fire missile targeting your focus fire room.
- Armor is good, most rooms have at least three and BT’s have four and five.
- Boarders who roam between reactors will have a hard time on this ship. The reactors are separated and there is a sec gate between each reactor.
Bad about this build:
- Power is a bit over, so AS should be powered off at the start of the battle. You can have it take excess power if another room is damaged, to produce service droids and help repair. (Friendly room HP <50% – increase power by one)
- Laser repair AI is tricky as there are many laser rooms and they are separated by a level. Make sure repair crew can get to any targeted room quickly.
Level 8 Fed Teleport

Good about this build:
- Short lifts mean quick travel times for repair crew.
- Crew won’t get stuck inside the shield room waiting for elevator and get shot, they can wait in the security gate.
- Strategy is good, centered around teleport with a whole collection of lasers to back it up.
- Armoring is reasonably even. If the MSL’s are getting shot more often, you can move armor from the top MLZ to better armor the MSL’s.
Bad about this build:
- MG and top MLZ are really far apart – a crew tasked with repairing lasers might have to go to either one. For a crew in the middle, either trip is not too bad. Make sure your crew with highest seniority for repairing lasers are in the plasma cannon because it’s equidistant.
- Bottom right security gate may be superfluous; it will be rare that an enemy crew will walk through there. Also, the ship is one power over so it may be better to just remove it.
Level 8 Fed hangar
This is a guest build by bricklayer96

Good about this build:
- Solid armoring, rooms are evenly armored.
- Lifts are excellent – two short lifts that provide fast transport.
- Good strategy. Slow-developing hangar is paired with PD to take down the shield by the time craft arrive. One missile can EMP an AA while all other guns, craft, and missile shoot the other AA.
- Reactors are very spread out (so boarders have long paths to run), and their are double security gates. This is an anti-boarding ship.
Bad about this build:
- Bottom five spaces are wasted, which may matter if you need space for lots of crew rooms.
- AS is slightly underarmored, would prefer at least four.
- Power is over by five. PD should be powered down when enemy ship HP is less than 100.
Level 9 Fed gunship

Good about this build:
- Defensive gunship with double droid room (you can use VM or ZF along with the AS) and SB, room choice is good for this strategy.
- Armoring is very good, rooms with two HP have at least four armor.
- Three short lifts provide quick transit between levels and the build is compact with key rooms in the center.
Bad about this build:
- This ship may be too defensive (not enough guns) to destroy other ships and may have many long battles where neither ship can damage the other. If this is the case you can pivot your strategy:
- Remove an MLZ and the ZF and add a hangar, for much better late game DPS.
- Remove the SB and add a TLP to disrupt the enemy ship more. The AS can produce boarder droids to supplement your boarding crew.
- Remove the ZF and add both BT’s for a much more aggresive gunship. This will require more rework of the layout.
- AS, SHL, and a few laser rooms directly touch elevators, which may mean repairers will get stuck trying to leave the room. Make sure your repair AI minimizes this by having crew repair from the same level so that the elevator doesn’t need to move up and down.
- There are some wasted grid spaces below the MLZ and MG, and above the SHL and SB. This may make it difficult to fit in all the needed non-combat rooms especially if you have many bedrooms.
- The lift on the far right may be unnecessary – check to see how often your crew use it.
Level 10+
At this point you should have enough understanding to create your own layouts! But if you need some inspiration, you can always look at top players! Scan the top 100 players for instance and see what they are doing.
Next: Intro to Room AI